
In a previous post we mentioned that exposure is a combination of three variables: Aperture, Shutter Speed and ISO. Here we take a quick look at ISO.
What is ISO?
In digital photography, setting the ISO determines how sensitive your camera’s image sensor is to the light that is reaching it through the lens opening.
The lower the number the less sensitive your camera is to light. Higher ISO settings are generally used in situations where there is less light to get faster shutter speeds; however the cost is noisier (grainier) shots. See below for a brief explanation of NOISE.
With a small amount of experimenting you will quickly notice that varying in the ISO has an impact on the shutter speed and aperture settings that are available to you. For example, if you increase your ISO from 100 to 400 you’ll notice that you can shoot at higher shutter speeds and/or smaller apertures. Increase it to 1600 and you can keep shooting well into dusk.
Reasons to choose a low ISO:
-
Good light allows a wide enough choice of aperture / shutter speed combinations
-
Camera/lens is supported on a tripod, so low shutter speeds are possible
-
Subject is not moving so low shutter speeds can be used
Reasons to choose a high ISO:
-
Light is poor and does not allow an adequate range of aperture / shutter speed combinations
-
Poor light and a high maximum lens aperture (say f5.6) mean that your photographs will be under-exposed using a low ISO
-
Light is poor and you want to use a fast shutter speed to freeze subject movement
-
For artistic purposes you want a grainy photograph
AUTO ISO
Most DSLRs will give you the option of choosing either an ‘Auto ISO’ mode where the camera selects the appropriate ISO setting depending upon the conditions you’re shooting in or a manual mode where you set the ISO yourself, according to your assessment of the circumstances.
To use AUTO ISO in its simplest form you enter (via your camera’s menu options) the lowest ISO setting that you want your camera to use. Once this is set your camera can increase or lower the ISO setting but it cannot select an ISO setting lower than the one you have specified.
Configuring AUTO ISO
More sophisticated DSLRs will let you set additional parameters for AUTO ISO.
Usually this means you can pre-set the maximum ISO that your camera can select and the minimum shutter speed that your camera can use before setting a higher ISO.
For example: if you set a maximum ISO of 1600 and a minimum shutter speed of 1/125s, your camera will increase the ISO each time the shooting conditions require a shutter speed lower than 1/125s. However, your camera will not be able to set an ISO higher than 1600.
This means that before you even start taking photographs you can pre-determine how your camera will deal with the light conditions and it is therefore one less thing that you need to worry about.
What is NOISE?
In the days when all our cameras used film, it was accepted that films with a low ISO rating gave fine grain free photographs and films with a high ISO tended to produce much grainier pictures.
In digital photography what used to be referred to as graininess is now terms noise. In simple terms noise is randomly coloured dots that appear on your image.
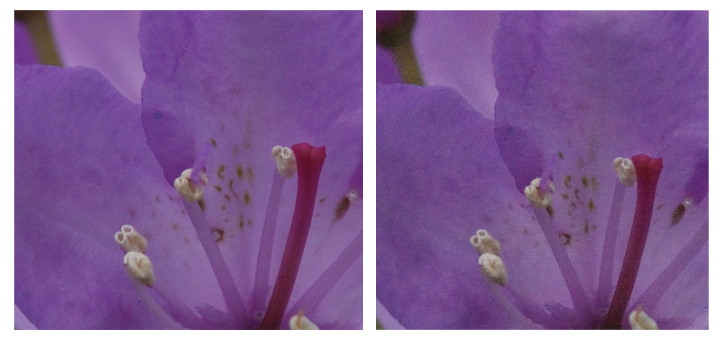
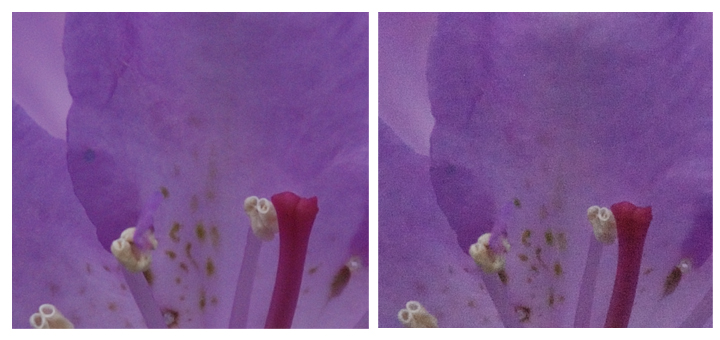
At low magnification levels the effect of noise can be minimal – so if you are not enlarging your photographs it may not matter to you – but as you increase magnification the noise becomes much more obvious. In the comparison below you can clearly see that the image on the right is not as shar as the one on the left.
If you aren’t particularly interested in the technical explanation of why noise is created you can skip the next couple of paragraphs.
There are 2 causes of noise:
1 – Thermal or heat generated noise.
2 – High ISO noise
Thermal Noise
When your camera’s shutter is open and your sensor is recording an image, it generates a small amount of heat. This heat can free electrons from the sensor which contaminate the electrons that have been created by light hitting the photocells on your camera’s sensor. This contamination shows up as noise.
High ISO noise
Background electrical noise exists in any electrical device. In much the same way that when you turn the volume on your music system up high you amplify the sound when you increase the ISO to high levels you amplify the signals reaching your sensor.
When you amplify the signals you also amplify the background noise.
Most of the time this noise is not noticeable but, just as when the volume is high on your music system you can sometimes hear a slight hissing when the music is quiet during the silence in between tracks, so the amplified signals can show up on your images as random coloured specks. These dots or specks will be most noticeable in darker parts of your photograph or areas that have little detail.
Chrominance and Luminance
Noise is made up of 2 elements, Chrominance and Luminance.
Chrominance refers to the coloured specks and Luminance refers to the size and shape of the specks.
Image processing software like Photoshop, Lightroom or Nikon Capture NX give you sophisticated tools for dealing with noise.
Fortunately, each new generation of digital cameras gets better and better at dealing with noise, allowing you to use higher ISO settings without noise spoiling your images.